函数 可选参数 Dart 的可选参数要用方括号,并在类型后面添加问号
1
2
3
4
5
6
7
String fullName(String first, String last, [String? title]) { if (title != null ) { return '$title $first %% %%$last ' ; } else { return '$first $last ' ; } }
默认值 1 2 3 4 5 6 7 8 bool withinTolerance(int value, [int min = 0 , int max = 10 ]) { return min <= value && value <= max; } withinTolerance(9 , 7 , 11 ) withinTolerance(9 , 7 )
命名参数 可选参数你要记住这几个参数是什么含义,但是过了一段时间你可能就不知道了,所以有了命名参数
1 2 3 4 5 6 7 8 9 10 bool withinTolerance(int value, {int min = 0 , int max = 10 }) { return min <= value && value <= max; } withinTolerance(9 , min: 7 , max: 11 ) withinTolerance(9 , max: 11 , min: 7 )
命名参数默认也是可选的,所以也可以这样调用
1 2 3 4 withinTolerance(5 ) withinTolerance(15 ) withinTolerance(5 , min: 7 ) withinTolerance(15 , max: 20 )
必需参数并命名 可以用大括号配合 required 关键字
1 2 3 4 5 6 7 8 bool withinTolerance({ required int value, int min = 0 , int max = 10 , }) { return min <= value && value <= max; }
箭头函数 1 2 3 4 5 6 7 8 int add(int a, int b) { return a + b; } int add(int a, int b) => a + b;
构造函数 如果没有指定构造函数, Dart 会提供一个默认不带参数的构造函数。
1 2 3 4 5 class Address var value = '' ; }
相当于这样写:
1 2 3 4 5 6 class Address Address(); var value = '' ; }
自定义构造函数 1 2 3 4 5 6 7 8 9 10 11 12 13 14 class User User(int id, String name) { this .id = id; this .name = name; } int id = 0 ; String name = '' ; } final user = User(42 , 'Ray' );print (user);
可以简短一点
1 2 3 User(this .id, this .name);
命名构造函数 命名构造函数的模式:
1 ClassName.identifierName()
例如,假设您希望拥有一个具有预设 ID 和名称的匿名用户。您可以通过创建命名构造函数来做到这一点。
1 2 3 4 5 6 7 8 9 User.anonymous() { id = 0 ; name = 'anonymous' ; } final anonymousUser = User.anonymous();print (anonymousUser);
转发构造函数 因为 User 本来有一个自定义构造函数可以传 id 和 name,那么 anonymous 这个命名构造函数可以调用这个自定义的构造函数,会更方便一点:
1 2 3 User.anonymous() : this (0 , 'anonymous' );
还可以结合命名参数做一次简化
1 2 3 4 5 6 7 8 9 10 11 12 13 14 class User User({this .id = 0 , this .name = 'anonymous' }); User.anonymous() : this (); int id; String name; }
初始化列表 如果你不希望其他人改掉 id 和 name 属性,那么就要改成私有属性,加个 _ 就是私有属性了(在同一个文件还是可以访问),: 后面的就是初始化列表
1 User({int id = 0 , String name = 'anonymous' }) : _id = id, _name = name;
这个构造函数也是有主体的,会指定初始化列表的内容再指定主体
1 2 3 4 User({int id = 0 , String name = 'anonymous' }) : _id = id, _name = name { print ('User name is $_name ' ); }
常量构造函数 如果你不希望其他人改掉 id 和 name 属性,除了改成私有属性,还可以让属性变为不可变,用 final 和 const。
但是,由于编译器直到运行时才知道属性值是什么,因此唯一的选择是使用 final 。
1 2 final String _name;final int _id;
让类不可变,在构造函数添加 const 可以保证所有实例都是常量
1 2 3 4 5 6 7 8 9 const User({int id = 0 , String name = 'anonymous' }) : _id = id, _name = name;const User.anonymous() : this ();const user = User(id: 42 , name: 'Ray' );const user1 = User(id: 42 , name: 'Ray' );print ("${identical(user, user1)} " );const anonymousUser = User.anonymous();
工厂构造函数 上面的构造函数只能创建类分身的实例,但是工厂构造函数还可以创建子类的实例。如果想要对使用类的代码隐藏类的实现细节时,非常有用。
工厂构造函数以 factory 开头并返回类类型对象的方法。
最常见的使用工厂构造函数来实现
1 2 3 4 5 6 7 8 9 factory User.fromJson(Map <String , Object > json) { final userId = json['id' ] as int ; final userName = json['name' ] as String ; return User(id: userId, name: userName); } final map = {'id' : 10 , 'name' : 'Sandra' };final sandra = User.fromJson(map);
静态成员 static 关键字,放在成员变量或者方法前面就是类方法和类变量。
1 2 3 4 5 6 7 8 9 10 11 class SomeClass static int myProperty = 0 ; static void myMethod() { print ('Hello, Dart!' ); } } final value = SomeClass.myProperty;SomeClass.myMethod();
颜色代码实例:
1 2 3 4 5 class Colors static const int red = 0xFFD13F13 ; static const int purple = 0xFF8107D9 ; static const int blue = 0xFF1432C9 ; }
单例 1 2 3 4 5 6 7 class MySingleton MySingleton._(); static final MySingleton instance = MySingleton._(); } final MySingleton = Mysingleton.instance;
还可以使用工厂构造函数实现单例
1
2
3
4
5
6
class MySingleton MySingleton._(); static final MySingleton _instance = MySingleton._(); factory MySingleton() => _instance; }
Null null 是 Null 类的唯一实例。用 null 调用其他没有实现的方法会报错。
可选类型
1 2 3 4 5 6 7 8 9 10 11 int? myInt = null ;double? myDouble = null ;bool? myBool = null ;String? myString = null ;User? myUser = null ;
?? 和 ??= ?? 是一个条件操作符,??= 是一个赋值操作符。
1 2 3 String a = b ?? 'hello' ;b ??= 'hellol' ;
.. .. 是级联运算符,它允许您在同一对象上调用多个方法或设置多个属性。如果您知道该对象不可为空,则可以使用级联运算符:
1 2 3 4 5 6 class User String? name; int? id; } User user = User()..name = 'Ray' ..id = 42 ;
如果对象是可选对象,User? user; 那么久可以使用 ?..
1 user?..name = 'Ray' ?..id = 42 ;
Late 关键字 有点像 Swift 的 lazy 懒加载。
您有一个名为 _secretNumber 的不可为空字段。您希望根据 _calculateSecret 实例方法中复杂算法的返回值来初始化它。但你有一个问题,因为 Dart 不允许你在初始化期间访问实例方法。这可以用 late 关键字来解决这个问题。
1 late final int _secretNumber = _calculateSecret();
使用 late 意味着 Dart 不会立即初始化变量。它仅在您第一次访问时对其进行初始化。这也称为延迟初始化。
1 2 3 4 5 6 7 8 9 10 11 class User User(this .name) { _secretNumber = _calculateSecret(); } late final int _secretNumber; }
Abstract 抽象类 1 2 3 4 5 6 7 8 9 10 11 12 13 14 abstract class Animal bool isAlive = true ; void eat(); void move(); @override String toString() { return "I am a $runtimeType " ; } }
抽象类的方法都必须实现,也能有具体的字段,比如 isAlive ,默认值为 true
具体子类 1 2 3 4 5 6 7 8 9 10 11 12 13 14 15 16 17 18 class Platypus extends Animal @override void eat() { } @override void move() { } void layEggs() { } }
使用抽象子类
1 2 3 4 5 6 final platypus = Platypus();print (platypus.isAlive);platypus.eat(); platypus.move(); platypus.layEggs(); print (platypus);
Interfaces 接口 接口可以隐藏具体实现细节,如果你需要一个接口中的功能,刚好你用的类实现了这个接口,那么直接用就行了,不需要知道这个类是怎么实现的
在 Dart 中接口没有关键字,可以使用任何类作为接口 。由于只有字段和方法名称很重要,因此大多数接口都是由不包含逻辑的抽象类组成的。
抽象接口类 1 2 3 4 5 6 7 8 9 10 11 abstract class DataRepository double? fetchTemperature(string city); } class FakeWebServer implements DataRepository @override double? fetchTemperature(String city) { return 42.0 ; } }
使用工厂构造函数,这样业务逻辑和实现细节可以分离
1 2 3 4 5 6 7 8 9 abstract class DataRepository factory DataRepository() => FakeWebServer(); double? fetchTemperature(string city); } final repository = DataRepository();final temperature = repository.fetchTemperature('Manila' );
Mixins 混入 假设有一群鸟,创建一个抽象类来代表它们
1 2 3 4 5 abstract class Bird void fly(); void layEggs(); }
然后创建一个子类
1 2 3 4 5 6 7 8 9 10 11 12 class Robin extends Bird @override void fly() { print ('Swoosh swoosh' ); } @override void layEggs() { print ('Plop plop' ); } }
注意,layEggs 和 Platypus 类中的 layEggs 是一样的实现,如果要改的话可能要改两遍,这是不太好的,如果 fly 的实现也是通用的话,那么也可以使用 Mixins 来实现
1 2 3 4 5 6 7 8 9 10 11 12 13 14 15 16 17 18 19 20 21 22 23 24 25 26 27 28 mixin EggLayer { void layEggs() { print ('Plop plop' ); } } mixin Flyer { void fly() { print ('Swoosh swoosh' ); } } class Robin extends Bird with EggLayer , Flyer class Platypus extends Animal with EggLayer @override void eat() { print ('Munch munch' ); } @override void move() { print ('Glide glide' ); } }
Extension Methods 扩展方法 可以给系统库或者第三方的库中的类添加方法,也能添加 getter、setter、和运算符
1 2 3 extension on SomeClass { }
还可以给扩展本身命名:
1 2 3 extension YourExtensionName on SomeClass {}
Generics 泛型 泛型可以防止代码重复
1 2 3 4 5 6 7 class Node <T > T value; Node<T>? leftChild; Node<T>? rightChild; }
指定子类型的泛型
1 2 3 4 class BinarySearchTree <E extends Comparable <E >> Node<E>? root; }
Enhanced Enums 增强枚举 普通的枚举
1 2 3 4 5 6 7 8 9 10 11 12 13 14 15 16 17 18 19 20 21 22 enum TrafficLight { green, yellow, red, } final color = TrafficLight.green;switch (color) { case TrafficLight.green: print ('Go!' ); break ; case TrafficLight.yellow: print ('Slow down!' ); break ; case TrafficLight.red: print ('Stop!' ); break ; }
增强枚举版本:
1 2 3 4 5 6 7 enum TrafficLight { green('Go!' ), yellow('Slow down!' ), red('Stop!' ); const TrafficLight(this .message); final String message; }
有一个枚举构造函数,枚举构造函数都是用 const,green、yellow、red 都是调用这个构造函数的枚举实例,最后一个实例用 ; 隔开。使用起来就非常方便了。
1 2 final color = TrafficLight.green;print (color.message);
增强枚举也可以重载运算符,添加方法,实现接口,还可以添加混入
1 2 3 4 5 6 7 8 9 10 11 12 13 14 15 16 17 18 enum Fruit with Describer { cherry, peach, banana, } enum Vegetable with Describer { carrot, broccoli, spinach, } mixin Describer on Enum { void describe() { print ('This $runtimeType is a $name .' ); } }
在 mixin 中使用 on 关键字可以访问 Enum 类的 name 属性,使用 mixin
1 2 3 4 final fruit = Fruit.banana;final vegi = Vegetable.broccoli;fruit.describe(); vegi.describe();
使用泛型 假设您有一些默认值想要与每个枚举值关联。默认字体是“roboto”,一个 String ;默认大小为 17.0,a double ;默认权重为 400,即 int 。每个枚举值都是 Enum 的不同实例。当不同的实例使用不同类型的值时,您需要泛型来处理它们。
1 2 3 4 5 6 7 8 9 enum Default<T extends Object > { font<String >('roboto' ), size<double >(17.0 ), weight<int >(400 ); const Default(this .value); final T value; }
Error Handling 错误处理 捕获异常 用 try catch
1 2 3 4 5 6 7 8 9 10 11 12 13 14 import 'dart:convert' ;void main() { const json = 'abc' ; try { dynamic result = jsonDecode(json); print (result); } catch (e) { print ('There was an error.' ); print (e); } }
处理特定异常 1 2 3 4 5 6 7 8 9 const json = 'abc' ;try { dynamic result = jsonDecode(json); print (result); } on FormatException { print ('The JSON string was invalid.' ); }
处理多个异常 1 2 3 4 5 6 7 8 9 10 11 12 13 14 15 16 17 18 19 20 21 22 23 24 25 26 27 28 29 30 31 32 33 34 35 36 37 38 39 40 41 void main() { const numberStrings = ["42" , "hello" ]; try { for (final numberString in numberStrings) { final number = int .parse(numberString); print (number ~/ 0 ); } } on FormatException { handleFormatException(); } on UnsupportedError { handleDivisionByZero(); } } void handleFormatException() { print ("You tried to parse a non-numeric string." ); } void handleDivisionByZero() { print ("You can't divide by zero." ); }
Finally 1 2 3 4 5 6 7 8 9 10 11 12 13 14 15 16 17 18 19 20 21 22 23 24 25 26 27 28 29 30 31 32 33 34 35 36 void main() { final database = FakeDatabase(); database.open(); try { final data = database.fetchData(); final number = int .parse(data); print ('The number is $number .' ); } on FormatException { print ("Dart didn't recognize that as a number." ); } finally { database.close(); } } class FakeDatabase void open() => print ('Opening the database.' ); void close() => print ('Closing the database.' ); String fetchData() => 'forty-two' ; }
自定义异常 1 2 3 4 5 6 7 8 9 10 11 12 13 14 15 16 17 18 19 20 21 22 23 24 25 26 27 28 29 30 31 class ShortPasswordException implements Exception ShortPasswordException(this .message); final String message; } class NoNumberException implements Exception NoNumberException(this .message); final String message; } class NoUppercaseException implements Exception NoUppercaseException(this .message); final String message; } class NoLowercaseException implements Exception NoLowercaseException(this .message); final String message; }
抛出异常,用 throw
1 2 3 4 5 6 7 8 9 10 11 void validateLength(String password) { final goodLength = RegExp (r'.{12,}' ); if (!password.contains(goodLength)) { throw ShortPasswordException('Password must be at least 12 characters!' ); } }
处理异常,可以用 on catch 组合来访问异常类
1 2 3 4 5 6 7 8 9 10 11 12 13 14 15 16 17 18 19 20 21 22 23 24 25 26 const password = 'password1234' ;try { validatePassword(password); print ('Password is valid' ); } on ShortPasswordException catch (e) { print (e.message); } on NoLowercaseException catch (e) { print (e.message); } on NoUppercaseException catch (e) { print (e.message); } on NoNumberException catch (e) { print (e.message); }
Concurrency 并发 Dart 是一种单线程语言。
并行的问题:比如多个线程访问相同内存的值,如果一个线程在内存中保存一个值,并期待该线程程稍后检查该值时该值相同。但是,如果第二个线程修改该值,第一个线程就会感到困惑。追踪这些类型的错误可能是一件令人头疼的事情,因为它们的来源与报告错误的代码完全分开。支持多线程的语言需要设置一个锁系统 ,这样值就不会在错误的时间改变。设计、实现和调试多线程系统的认知负担可能很重。
Dart 的单线程运行在 isolate 。每个 isolate 都有自己分配的内存,确保没有 isolate 可以访问任何其他 isolate 的状态。这意味着不需要复杂的锁系统。这也意味着敏感数据更加安全。这样的系统大大减轻了程序员的认知负担。
但是并发不会很慢吗?
并发版本确实需要更长的时间,但也不会太长。原因是并行线程大部分时间处于空闲状态。单个线程通常足以完成需要完成的事情。
Flutter 必须每秒更新 UI 60 次。每个更新时间片称为一个帧。这样就剩下大约 16 毫秒的时间来在每一帧上重新绘制 UI。通常不会花费那么长时间,让您有时间在线程空闲时执行其他工作。只要这项工作不会阻止 Flutter 更新下一帧的 UI,用户就不会注意到任何问题。诀窍是在线程停机期间安排任务。
Dart 使用 event loop(事件循环)来调度异步任务。
事件循环有两个队列:事件队列和微任务队列,事件队列用于处理诸如用户触摸屏幕或来自远程服务器的数据之类的事件。 Dart 主要在内部使用微任务队列来优先处理某些无法等待事件队列中的任务完成的小任务。
主隔离线程中的同步任务始终立即运行。你不能打断他们。
如果 Dart 发现任何同意推迟的长时间运行的任务,Dart 会将它们放入事件队列中。
当 Dart 完成运行同步任务时,事件循环会检查微任务队列。如果微任务队列有任何任务,事件循环会将它们放在主线程上接下来执行。事件循环不断检查微任务队列,直到它为空。
如果同步任务和微任务队列都为空,事件循环将发送事件队列中的下一个等待任务在主线程上运行。一旦到达那里,代码就会同步执行。与任何其他同步代码一样,启动后没有任何东西可以中断它。
如果新的微任务进入微任务队列,事件循环会在事件队列中的下一个事件之前处理它们。
这个过程一直持续到所有队列都为空为止。
虽然 Dart 是单线程的,但是也会在另一个线程运行任务。例如,当您要求读取系统上的文件时,该工作不会在 Dart 线程上进行。系统正在其自己的进程内完成工作。系统完成工作后,会将结果传递回 Dart,Dart 会调度一些代码来处理事件队列中的结果。 dart:io 库中的许多 I/O 工作都是以这种方式发生的。
另一个方法是创建新的 isolate ,新的 isolate 有自己的内存和线程,并与主 isolate 并行工作,两个 isolate 只能通过 message 来通信,他们无法访问彼此的内存状态。
添加任务到事件队列 1 2 3 4 5 6 7 print ('first' );Future( () => print ('second' ), ); print ('third' );
事件队列代码必须等到所有同步代码完成才能运行,所以 second 是最后打印
添加任务到微任务队列 除非你在写底层的库,不然不太需要这个东西
1 2 3 4 5 6 7 8 9 10 11 print ('first' );Future( () => print ('second' ), ); Future.microtask( () => print ('third' ), ); print ('fourth' );
完成任务后执行同步代码 1 2 3 4 5 6 7 8 9 10 11 12 13 print ('first' );Future( () => print ('second' ), ).then( (value) => print ('third' ), ); Future( () => print ('fourth' ), ); print ('fifth' );
延迟任务 1 2 3 4 5 6 7 8 print ('first' );Future.delayed( Duration (seconds: 2 ), () => print ('second' ), ); print ('third' );
练习 打印顺序
1 2 3 4 5 6 7 8 9 10 11 12 13 14 15 16 17 18 19 20 21 22 23 24 25 26 27 28 29 30 31 32 33 34 35 36 37 38 39 40 41 42 43 void main() { print ('1 synchronous' ); Future(() => print ('2 event queue' )).then( (value) => print ('3 synchronous' ), ); Future.microtask(() => print ('4 microtask queue' )); Future.microtask(() => print ('5 microtask queue' )); Future.delayed( Duration (seconds: 1 ), () => print ('6 event queue' ), ); Future(() => print ('7 event queue' )).then( (value) => Future(() => print ('8 event queue' )), ); Future(() => print ('9 event queue' )).then( (value) => Future.microtask( () => print ('10 microtask queue' ), ), ); print ('11 synchronous' ); }
Futures 拿到 Future 结果
1 2 3 4 5 6 7 print ('Before the future' );final myFuture = Future<int >.delayed(Duration (seconds: 1 ),() => 42 ,).then((value) => print ('Value: $value ' ),) .catchError((Object error) => print ('Error: $error ' ),) .whenComplete(() => print ('Future is complete' ),); print ('After the future' );
可以用 async 和 await 改造
1 2 3 4 5 6 7 8 9 10 11 12 13 14 15 16 17 18 19 print ('Before the future' );try { final value = await Future<int >.delayed(Duration (seconds: 1 ),() => 42 ,); print ('Value: $value ' ); } catch (error) { print (error); } finally { print ('Future is complete' ); } print ('After the future' );
可以用 Completer 拥有最大的灵活性
Streams Streams 和 Futures 的区别是,Futures 是返回一个值,然后就结束了,Streams 会一直发送值,直到发送结束。
读取文件字符串
1 2 3 4 5 6 7 8 9 import 'dart:io' ;Future<void > main() async { final file = File('assets/text.txt' ); final contents = await file.readAsString(); print (contents); }
如果文件很大,可以作为流来读取,这样可以更快地开始处理数据,不用像上面那样等待读取整个文件完成,下面是按流读取的例子:
1 2 3 4 5 6 7 8 9 10 final file = File('assets/text_long.txt' );final stream = file.openRead();stream.listen( (data) { print (data.length); }, );
也可以用 异步 for 循环来读取
1 2 3 4 5 6 7 8 9 10 11 12 13 14 15 Future<void > main() async { final file = File('assets/text_long.txt' ); final stream = file.openRead(); await for (var data in stream) { print (data.length); } }
处理错误 第一种方法是使用 onError
1 2 3 4 5 6 7 8 9 10 11 12 13 14 15 16 17 18 19 20 21 22 23 24 25 26 27 final file = File('assets/text_long.txt' );final stream = file.openRead();stream.listen( (data) { print (data.length); }, onError: (Object error) { print (error); }, onDone: () { print ('All finished' ); }, );
发生错误后,并不会取消流的监听,会继续接收到数据,listen 还有一个 cancelError 参数,设置 true 就会取消
第二种方法是使用 Try-Catch\
1 2 3 4 5 6 7 8 9 10 11 12 13 14 15 16 17 18 19 20 21 22 23 24 25 try { final file = File('assets/text_long.txt' ); final stream = file.openRead(); await for (var data in stream) { print (data.length); } } on Exception catch (error) { print (error); } finally { print ('All finished' ); }
取消流 如果没有错误怎么随时取消监听流?
1 2 3 4 5 6 7 8 9 10 11 12 13 14 15 16 17 18 19 20 21 22 23 24 25 26 27 28 29 30 31 32 33 34 35 36 37 38 39 import 'dart:async' ;import 'dart:io' ;void main() { final file = File('assets/text_long.txt' ); final stream = file.openRead(); StreamSubscription<List <int >>? subscription; subscription = stream.listen( (data) { print (data.length); subscription?.cancel(); }, cancelOnError: true , onDone: () { print ('All finished' ); }, ); }
调用 listen 返回 StreamSubscription ,它是 dart:async 库的一部分。在 subscription 变量中保留对此的引用可以让您随时取消订阅。在这种情况下,您可以在第一个数据事件后取消它。
转换流 1 2 3 4 5 6 7 8 9 10 11 12 13 14 15 16 17 18 19 20 21 22 23 24 25 import 'dart:convert' ;import 'dart:io' ;Future<void > main() async { final file = File('assets/text.txt' ); final byteStream = file.openRead(); final stringStream = byteStream.transform(utf8.decoder); await for (var data in stringStream) { print (data); } }
创建流 有几种方式创建流:
使用 Stream 构造函数
使用异步生成器
使用流控制器
Stream 构造函数
Stream.empty
Stream.value
**Stream.error**:单个错误的流
**Stream.fromFuture**:将 future 转为流
Stream.fromFutures
**Stream.fromIterable**:将可迭代集合转为流
下面的示例将演示使用 fromFutures 构造函数构建流。
1 2 3 4 5 6 7 8 9 10 11 12 13 14 15 16 17 18 19 20 21 22 23 24 25 26 final first = Future(() => 'Row' );final second = Future(() => 'row' );final third = Future(() => 'row' );final fourth = Future.delayed( Duration (milliseconds: 300 ), () => 'your boat' , ); final stream = Stream<String >.fromFutures([ first, second, third, fourth, ]); stream.listen((data) { print (data); });
异步生成器 使用 async* 关键字来创建异步生成器,返回流的函数。 async 是返回 future 的函数
1 2 3 4 5 6 7 8 9 10 11 12 13 14 15 16 17 18 19 Stream<String > consciousness() async * { final data = ['con' , 'scious' , 'ness' ]; for (final part in data) { await Future<void >.delayed(Duration (milliseconds: 500 )); yield part ; } } final stream = consciousness();stream.listen((data) { print (data); });
流控制器 sink 相当于水槽,stream 相当于水管,将数据扔进水槽就像是向流中添加一条数据
1 2 3 4 5 6 7 8 9 10 11 12 13 14 15 16 17 18 19 20 21 22 23 24 25 26 27 28 29 30 31 32 33 34 35 36 37 38 39 40 41 42 import 'dart:async' ;Future<void > main() async { final controller = StreamController<String >(); final stream = controller.stream; final sink = controller.sink; stream.listen( (value) => print (value), onError: (Object error) => print (error), onDone: () => print ('Sink closed' ), ); sink.add('grape' ); sink.add('grape' ); sink.add('grape' ); sink.addError(Exception('cherry' )); sink.add('grape' ); sink.close(); }
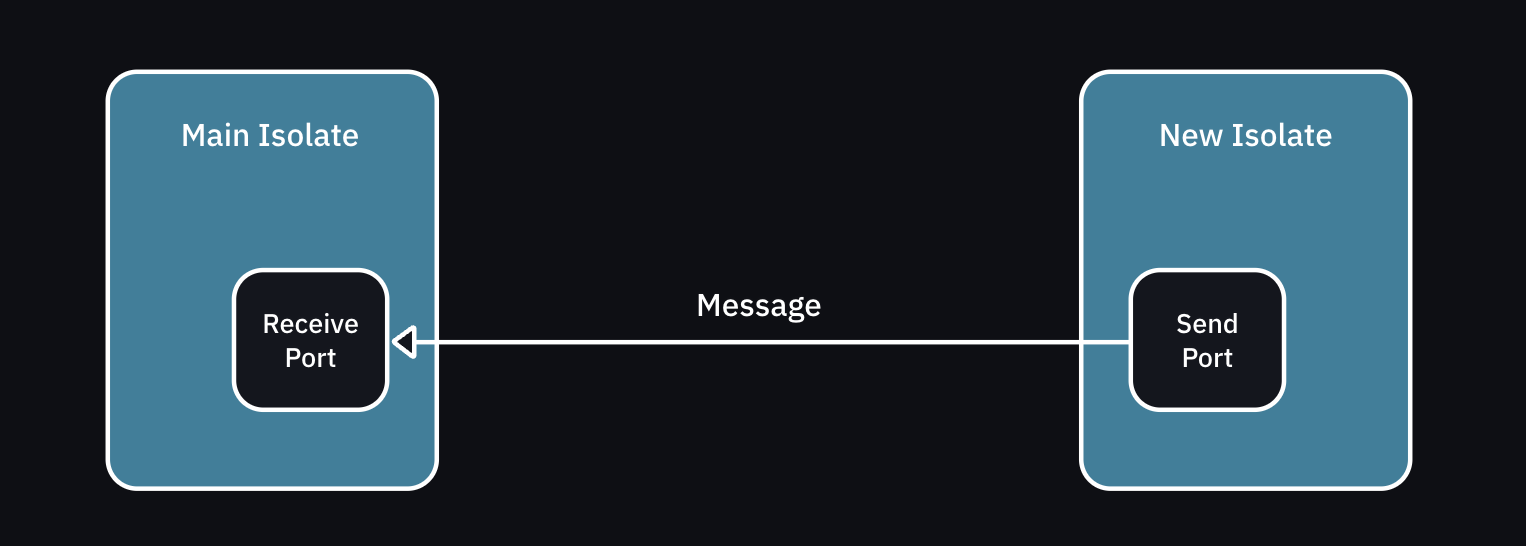
Isolates 如果有一个非常耗 CPU 的操作,那么使用 Future 是没用(如果知道原理的话),因为还是在主线程执行,还是会阻塞 App。
在创建 isolate 之前,先创建一个 ReceivePort 对象,当成 SendPort 属性的引用,这样新隔离可以通过发送端口将消息发送回主隔离的接收端口。
1 2 3 4 5 6 7 8 9 10 11 12 13 14 15 16 17 18 19 20 21 22 23 24 25 import 'dart:isolate' ;void playHideAndSeekTheLongVersion(SendPort sendPort) { var counting = 0 ; for (var i = 1 ; i <= 1000000000 ; i++) { counting = i; } final message = '$counting ! Ready or not, here I come!' ; Isolate.exit(sendPort, message); }
上面是新隔离要运行的代码,接下来是创建 isolate 本身:
1 2 3 4 5 6 7 8 9 10 11 12 13 14 15 16 17 18 19 20 21 22 23 24 25 26 27 28 29 30 31 32 33 34 35 Future<void > main() async { final receivePort = ReceivePort(); await Isolate.spawn<SendPort>( playHideAndSeekTheLongVersion, receivePort.sendPort, ); final message = await receivePort.first as String ; print (message); }
如果要传递多个参数的话需要改成传 List 或者 Mapcompute ,这个不用传 sendPort ,传
1 await compute(playHideAndSeekTheLongVersion, 1000000000 );
主 isolate 也可以主动退出创建的 isolate,只要约定一致就行
1 2 3 4 5 6 7 8 9 10 11 12 13 14 15 16 17 18 19 20 21 22 23 24 25 26 27 28 29 30 31 32 33 34 35 36 37 38 39 40 41 42 43 44 45 46 47 48 49 50 51 52 53 54 55 56 57 void playHideAndSeekTheLongVersion(SendPort sendPort) { sendPort.send("OK, I'm counting..." ); var counting = 0 ; for (var i = 1 ; i <= 1000000000 ; i++) { counting = i; } sendPort.send('$counting ! Ready or not, here I come!' ); sendPort.send(null ); } final receivePort = ReceivePort();final isolate = await Isolate.spawn<SendPort>( playHideAndSeekTheLongVersion, receivePort.sendPort, ); receivePort.listen((Object? message) { if (message is String ) { print (message); } else if (message == null ) { receivePort.close(); isolate.kill(); } });
监听到 null 的时候再关闭 receivePort 和 kill 掉 isolate
Two-Way Isolate Communication 双向隔离通信 如果你需要保持 isolate 一段时间,比如和游戏服务器进行通信,那么就要双向通讯,双方都需要一个 SendPort 和 ReceivePort。
1 2 3 4 5 6 7 8 9 10 11 12 13 14 15 16 17 18 19 20 21 22 23 24 25 26 27 28 29 import 'dart:io' ;class Work Future<int > doSomething() async { print ('doing some work...' ); sleep(Duration (seconds: 1 )); return 42 ; } Future<int > doSomethingElse() async { print ('doing some other work...' ); sleep(Duration (seconds: 1 )); return 24 ; } }
创建一个入口点
1 2 3 4 5 6 7 8 9 10 11 12 13 14 15 16 17 18 19 20 21 22 23 24 25 26 27 28 29 30 31 32 33 34 35 36 37 38 39 40 41 42 43 44 45 46 47 48 49 50 51 52 53 54 55 56 57 58 59 60 61 62 63 64 65 66 67 68 69 70 71 72 73 74 75 import 'dart:isolate' ;Future<void > _entryPoint(SendPort sendToEarthPort) async { final receiveOnMarsPort = ReceivePort(); sendToEarthPort.send(receiveOnMarsPort.sendPort); final work = Work(); receiveOnMarsPort.listen((Object? messageFromEarth) async { await Future<void >.delayed(Duration (seconds: 1 )); print ('Message from Earth: $messageFromEarth ' ); if (messageFromEarth == 'Hey from Earth' ) { sendToEarthPort.send('Hey from Mars' ); } else if (messageFromEarth == 'Can you help?' ) { sendToEarthPort.send('sure' ); } else if (messageFromEarth == 'doSomething' ) { final result = await work.doSomething(); sendToEarthPort.send({ 'method' : 'doSomething' , 'result' : result, }); } else if (messageFromEarth == 'doSomethingElse' ) { final result = await work.doSomethingElse(); sendToEarthPort.send({ 'method' : 'doSomethingElse' , 'result' : result, }); sendToEarthPort.send('done' ); } }); }
创建一个新的 isolate
1 2 3 4 5 6 7 8 9 10 11 12 13 14 15 16 17 18 19 20 21 22 23 24 25 26 27 28 29 30 31 32 33 34 35 36 37 38 39 40 41 42 43 44 45 46 47 48 49 50 51 52 53 54 55 56 57 58 59 60 61 62 63 64 65 66 67 68 69 70 71 72 73 74 75 76 77 78 79 80 81 82 83 84 85 86 87 88 89 90 91 92 93 94 95 96 97 98 99 100 101 102 103 104 105 106 107 class Earth final _receiveOnEarthPort = ReceivePort(); SendPort? _sendToMarsPort; Isolate? _marsIsolate; Future<void > contactMars() async { if (_marsIsolate != null ) return ; _marsIsolate = await Isolate.spawn<SendPort>( _entryPoint, _receiveOnEarthPort.sendPort, ); _receiveOnEarthPort.listen((Object? messageFromMars) async { await Future<void >.delayed(Duration (seconds: 1 )); print ('Message from Mars: $messageFromMars ' ); if (messageFromMars is SendPort) { _sendToMarsPort = messageFromMars; _sendToMarsPort?.send('Hey from Earth' ); } else if (messageFromMars == 'Hey from Mars' ) { _sendToMarsPort?.send('Can you help?' ); } else if (messageFromMars == 'sure' ) { _sendToMarsPort?.send('doSomething' ); _sendToMarsPort?.send('doSomethingElse' ); } else if (messageFromMars is Map ) { final method = messageFromMars['method' ] as String ; final result = messageFromMars['result' ] as int ; print ('The result of $method is $result ' ); } else if (messageFromMars == 'done' ) { print ('shutting down' ); dispose(); } }); } void dispose() { _receiveOnEarthPort.close(); _marsIsolate?.kill(); _marsIsolate = null ; } }
使用
1 2 3 4 5 6 7 8 9 10 11 Future<void > main() async { final earth = Earth(); await earth.contactMars(); }